
Adobe Lightroom is a powerful application widely used by photographers for editing and managing images. It comes in several versions, primarily Lightroom Classic, which is designed for desktop use with robust features for advanced editing, and Lightroom CC, a cloud-based solution that facilitates mobility and easy access across devices. Understanding the distinction between these versions is essential before diving into the workflow.
Getting Started with Lightroom
How to edit photos in lightroom , you are introduced to a user-friendly interface, primarily segregated into two crucial modules: the Library and Develop modules. The Library module serves as the hub for photo organization, enabling users to import, categorize, and locate images efficiently. In this module, you can create collections, utilize keywords, and rate your photos, which streamlines the management of extensive photo libraries.
Transitioning to the Develop module, users find an array of tools for editing photos. Here, you can adjust exposure, contrast, color balance, and apply various effects to enhance your images. To optimize your editing experience, it is advisable to familiarize yourself with these tools and their locations within the interface. Beginners are encouraged to explore features like sliders and presets, which can help streamline the editing process and offer creative possibilities with minimal effort.
When importing your photos into Lightroom, it’s important to efficiently select and organize files from your camera or devices. Keeping a well-structured folder hierarchy can significantly impact your workflow; therefore, invest time in organizing your collections right from the start. Use keywords and albums strategically to enhance retrieval and sorting. Learning to navigate these elements will facilitate a smoother transition into more advanced editing techniques as you progress in your photography journey.
Basic Photo Adjustments
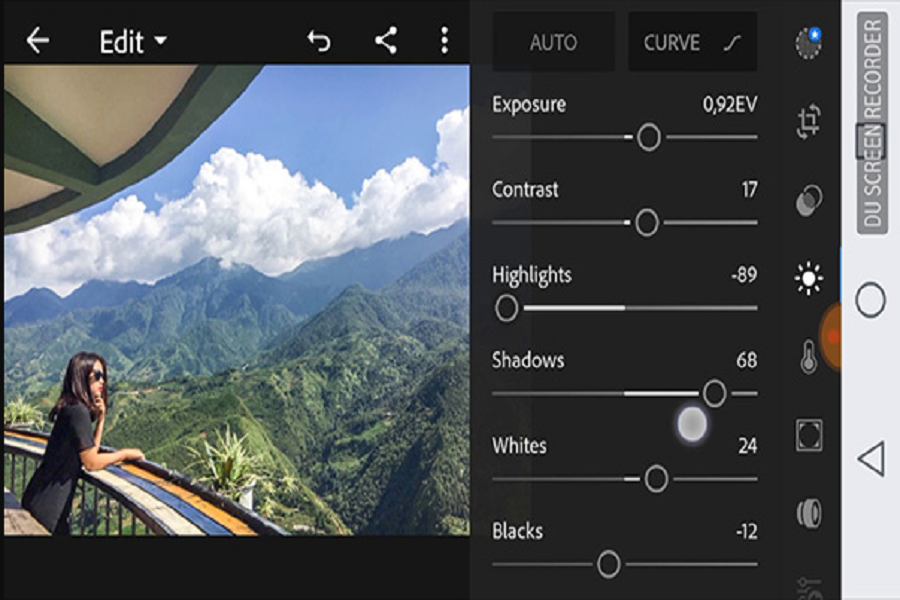
Photo editing in Adobe Lightroom begins with essential adjustments that significantly enhance the quality of an image. Among these fundamental techniques, exposure is one of the first elements to address. Adjusting the exposure modifies the overall brightness, ensuring that the image is neither overly dark nor uncomfortably bright. A careful balance here can transform a flat image into a vibrant one, capturing the viewer’s attention.
In tandem with exposure, contrast plays a crucial role. Increasing contrast heightens the difference between light and dark areas, which adds depth to images and brings out fine details. Conversely, reducing contrast can yield a more muted appearance, ideal for achieving a soft, dreamy effect. These adjustments, while seemingly straightforward, can dramatically alter the mood of an image.
Next, highlights and shadows adjustments allow finer control over specific tonal ranges. By adjusting highlights, users can recover clipped areas in bright regions, while the shadows slider can brighten dark areas without compromising the overall image integrity. The whites and blacks sliders further refine the tonal range, adding crispness or softness to the image, which is essential for achieving a polished look.
Color balance is another fundamental aspect of photo editing in Lightroom. The temperature and tint sliders facilitate adjustments in color warmth and coolness, allowing users to achieve a desired mood or style. Saturation enhances overall color intensity, while vibrance adjusts colors while preserving skin tones, resulting in a more balanced output. Through practical examples, one can observe how slight modifications in these areas can lead to significant visual improvement.
Ultimately, the art of mastering these basic photo adjustments in Adobe Lightroom lies in the subtleties of each change. Careful consideration should be given to the individual characteristics of each image, ensuring that the chosen adjustments enhance rather than overwhelm the final photograph.
Related Articles: Lg monitor for photo editing
Advanced Editing Techniques and Creative Effects
Adobe Lightroom offers a robust platform for photographers looking to elevate their editing game through advanced techniques. One of the most effective methods available is the use of masks for selective edits, which allows users to refine specific areas of an image without affecting the entire photograph. This feature is particularly useful when adjusting exposure, contrast, or color balance in one area while maintaining the original qualities in another. The brush, radial, and gradient masks provide diverse options, enabling photographers to tailor edits with precision.
Additionally, developing presets can significantly streamline the editing workflow, ensuring consistency across a series of images. By creating a library of personalized presets that encompass certain styles or moods, photographers can apply their preferred adjustments with a single click. This method not only saves time but also reinforces a coherent look, particularly valuable for project-based work or a cohesive social media aesthetic.
The tone curve is another powerful tool in Lightroom, allowing for nuanced color grading. By manipulating the lightness and contrast in more complex ways, photographers can achieve distinctive looks that might be hard to create with standard adjustment sliders. The tone curve enables fine-tuning of shadows, midtones, and highlights, offering a depth of control that enhances the visual impact of the image.
Moreover, exploring creative effects, such as black and white conversions, can add a compelling dimension to storytelling. A well-executed monochrome image can evoke emotion and focus attention on texture and form. Adding vignettes can further guide the viewer’s eye towards the subject, emphasizing the focal point while adding a subtle artistic flair. These advanced techniques, when utilized effectively, can truly unleash one’s artistic vision, transforming ordinary images into extraordinary works of art.